Creating a Recovery Partition in Windows 11 - pre
Step-by-step guide to shrinking the Windows partition, creating a 1.5 GB recovery partition in the correct disk position, and re-registering WinRE with reagentc.
Creating a Recovery Partition in Windows 11 - pre
TLDR: Shrink the Windows partition using GParted or MiniTool, create a 1.5 GB recovery partition in the freed space using
diskpart, then re-register WinRE usingreagentcfrom within Windows.
Why bother?
By default, Windows sometimes places the recovery partition at the end of the disk, or omits a proper one entirely after certain upgrade or clone operations. The correct layout — EFI → MSR → Recovery → Windows — ensures that WinRE (Windows Recovery Environment) is accessible even if the Windows partition is damaged, and makes future partition resizing cleaner since the recovery partition won’t be stranded at the end of the drive.
This guide assumes you have a medium level of comfort with disk tools and the command line. You will be working with partition operations — back up your data before proceeding.
Overview of the Process
- Backup WinRE and disable it so Windows releases its lock on the recovery partition.
- Shrink the Windows partition using GParted or MiniTool Partition Wizard (bootable USB), freeing 1.5 GB immediately before the Windows partition.
- Create and configure the recovery partition using
diskpart(or directly in GParted/MiniTool while you’re there). - Copy back the
Recoveryfolder containingwinre.wim. - Re-enable and re-register WinRE using
reagentc.
Target Partition Layout
| # | Type | Size |
|---|---|---|
| 1 | EFI System Partition | 500 MB |
| 2 | Microsoft Reserved (MSR) | 128 MB |
| 3 | Recovery (WinRE) | 1.5 GB |
| 4 | Windows (C:) | Remainder |
| 5 | Data / Other | (if applicable) |
Step 1 — Backup WinRE
Before touching partitions, disable WinRE so Windows releases its lock, then back up the recovery image.
Disable WinRE
1
2
reagentc /disable
reagentc /info
WinRE status should show Disabled.
Assign the existing Recovery partition a drive letter
From an elevated Command Prompt — assuming the Recovery partition is partition 4:
1
2
3
4
5
6
7
diskpart
  list disk
  select disk 0
  list partition
  select partition 4
  assign letter=R
  exit
Verify your partition number with
list partition— don’t assume it’s 4.
Copy the Recovery folder
Browse to R:\ (you may need to unhide system/hidden folders) and copy the Recovery folder — which contains winre.wim — somewhere safe on the Windows partition (e.g. C:\RecoveryBackup).
Step 2 — Shrink the Windows Partition (GParted or MiniTool)
Boot from a GParted Live USB or MiniTool Partition Wizard bootable USB.
- Select the Windows (C:) partition.
- Shrink it by 1536 MB (1.5 GB), placing the freed space before the Windows partition (i.e., to the left in the visual layout).
- Apply and reboot back into Windows.
Make sure the freed unallocated space lands between the MSR partition and the Windows partition — not at the end of the disk.
While you’re in GParted or MiniTool, it’s much easier to create the new recovery partition there directly — skip Step 3 if you do.
Step 3 — Create the Recovery Partition (diskpart)
Skip this step if you already created the partition in GParted or MiniTool.
Open Command Prompt as Administrator:
1
2
3
4
diskpart
  list disk
  select disk 0
  list partition
Confirm unallocated space is visible before the Windows partition.
Create and configure the recovery partition:
1
2
3
4
5
6
  create partition primary size=1536 offset=643072
  format quick fs=ntfs label="Recovery"
  set id=de94bba4-06d1-4d40-a16a-bfd50179d6ac
  gpt attributes=0x8000000000000001
  assign letter=R
  exit
The GUID
de94bba4-06d1-4d40-a16a-bfd50179d6acis the standard Windows Recovery partition type. The GPT attribute flags mark it as required and hidden.
The
offsetvalue may differ on your disk — verify withlist partitionand calculate accordingly, or omit it if the unallocated space is already in the correct position and diskpart will place it there automatically.
Step 4 — Copy Back the Recovery Folder
Copy the Recovery folder backed up in Step 1 to the root of the new R:\ partition, so that R:\Recovery\WindowsRE\winre.wim exists.
Step 5 — Re-enable WinRE
From an elevated Command Prompt:
1
2
3
reagentc /setreimage /path R:\Recovery\WindowsRE /target C:\Windows
reagentc /enable
reagentc /info
A successful result looks like this:
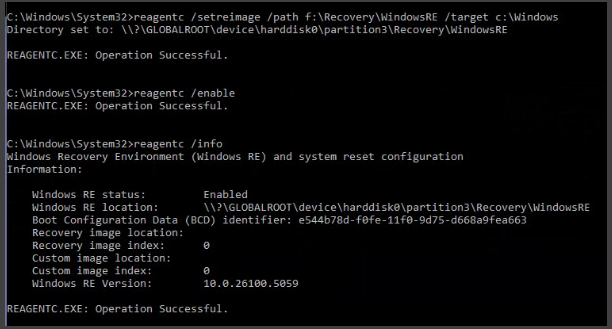
WinRE status should show Enabled and the path should point to the new partition.
Quick Reference — Commands Only
Step 1 — Disable WinRE and assign drive letter
1
2
3
4
5
6
7
8
9
reagentc /disable

diskpart
  list disk
  select disk 0
  list partition
  select partition 4
  assign letter=R
  exit
Step 3 — Create the Recovery Partition
1
2
3
4
5
6
7
8
9
10
diskpart
  list disk
  select disk 0
  list partition
  create partition primary size=1536 offset=643072
  format quick fs=ntfs label="Recovery"
  set id=de94bba4-06d1-4d40-a16a-bfd50179d6ac
  gpt attributes=0x8000000000000001
  assign letter=R
  exit
Step 5 — Re-enable WinRE
1
2
3
reagentc /setreimage /path R:\Recovery\WindowsRE /target C:\Windows
reagentc /enable
reagentc /info
Troubleshooting
reagentc /enablefails — confirm the partition type GUID and GPT attributes were set correctly. Runlist partitionin diskpart and verify the recovery partition exists.- WinRE path points to wrong location — use
reagentc /setreimage /path <path>to manually point it to the correct partition. - Unallocated space landed at the wrong position — both GParted and MiniTool let you choose which side the freed space goes; make sure it goes left (before Windows, not after).
This is a personal reference guide. Always verify partition numbers on your specific disk before running destructive commands.
© 2026 Michael Schmitz
This work is licensed under the Creative Commons Attribution-ShareAlike 4.0 International License.
You are free to share and adapt this work with attribution. Derivative works must be distributed under the same license.