Proxmox Add a Drive to a ZFS mirror
How to Add a Drive to ZFS in Proxmox
Before We Begin
Introduction — Why, What For
This is a small set of (terse but complete) instructions on how to add a larger drive to a Proxmox ZFS mirror and increase the total pool capacity without reinstalling anything.
So for example we have a zfs mirror with a 2 x 2TB hard drives:
1
2
sda    HD    1.8T   WDC WD2004FBYZ-01YCBB1_SN001    SATA-1
sdc    HD    1.8T   WDC WD2004FBYZ-01YCBB1_SN002    SATA-3
Pool layout:
1
2
3
4
5
    NAME
    rpool
      mirror-0
        ata-WDC_WD2004FBYZ-01YCBB1_SN001-part3
        ata-WDC_WD2004FBYZ-01YCBB1_SN002-part3
Now we want to replace one disk at a time with larger 14TB drives. In our example, we are adding:
1
sdb    HD   12.7T   WDC WD142KRYZ-01CMKB0_SN003    SATA-2
The basic process:
- Install the drive(s)
- Clone partition tables
- Resize the ZFS partition to fill the drive
- Attach it to the mirror (resilver)
- Remove the old drive
- Repeat for second drive
- Expand the pool capacity
The Commands:
A word of Caution:
Do NOT blindly copy and paste. Always verify the drive names.
This is not a just-copy-paste guide
In order to identify the drives, we can issue the command:
1
lsblk -o type,name,size,model,serial | grep -v zd
1. Clone the partition Tables
This does not copy any data, it only reproduces the partition boundaries
1
sfdisk -d /dev/sda | sfdisk --force /dev/sdb
Double check the results:
1
fdisk /dev/sdb
then presss p
This shows us the expected layout before resizing:
1
2
3
  /dev/sdb1       34       2047       2014 1007K BIOS boot
  /dev/sdb2     2048    2099199    2097152    1G EFI System
  /dev/sdb3  2099200 3907029134 3904929935  1.8T Solaris /usr & Apple ZFS
2. Resize the ZFS partition to full size
1
parted /dev/sdb  resizepart 3 100%
you may need to install
parted
Double check the results: fdisk /dev/sdb then press p
This should show us the layout:
1
2
3
4
  Device       Start         End     Sectors  Size Type
  /dev/sdb1       34        2047        2014 1007K BIOS boot
  /dev/sdb2     2048     2099199     2097152    1G EFI System
  /dev/sdb3  2099200 27344764894 27342665695 12.7T Solaris /usr & Apple ZFS
Notice the last partition is now 12.7T as opposed to 1.8T
3. Attach the new drive to the mirror
3-a. Identify the drive’s correct by-id symlink
List the drives filtering by sdb3 or whatever is the case for your dirve:
1
2
cd /dev/disk/by-id
ls -la | grep sdb3
Example:
1
ata-WDC_WD142KRYZ-01CMKB0_SN003-part3  -> ../../sdb3
This is the name we want to use.
3-b. Attach to the pool (start resilver)
Double-check the old drive name before running this.
1
2
3
zpool attach -f rpool \
  the-Old-HardDrive \
  the-New-HardDrive
In our Example, this looks like:
1
2
3
zpool attach -f rpool \
  ata-WDC_WD2004FBYZ-01YCBB1_SN001-part3 \
  ata-WDC_WD142KRYZ-01CMKB0_SN003-part3
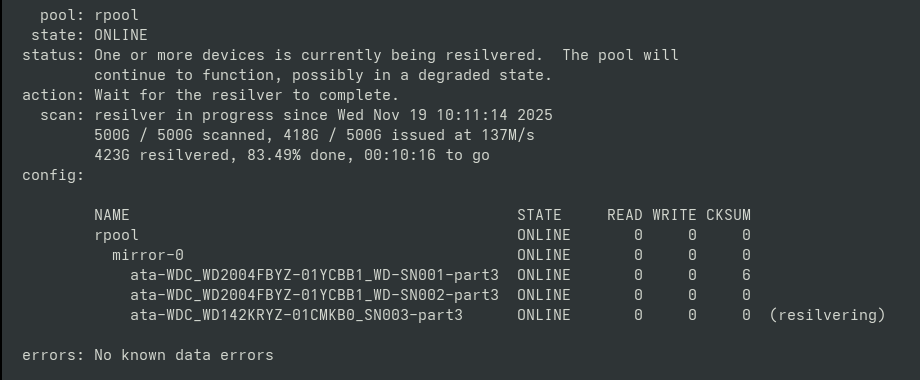
You can periodically check the resilvering status with
1
zpool status
The output should look like:
4. Recreate the boot partitions
Copy the BIOS/boot (partition 1)
1
dd if=/dev/sda1 of=/dev/sdb1 status=progress
Recreate the EFI boot information on partition 2
1
2
3
proxmox-boot-tool format /dev/sdb2 --force
proxmox-boot-tool init /dev/sdb2
proxmox-boot-tool refresh
NOTE: If you encounter an error after running
proxmox-boot-tool init /dev/sdb2that says:
This typically indicates that your system is using GRUB instead of
systemd-boot.To confirm, run
proxmox-boot-tool statusand look for the keyword “grub” in the output, for example:
In that case, use the following commands instead:
proxmox-boot-tool format /dev/sdb2 --force proxmox-boot-tool init /dev/sdb2 grub proxmox-boot-tool refresh
Check the final Status:
1
proxmox-boot-tool status
5. Detach the old Drive
Once resilver is complete:
1
sudo zpool detach rpool ata-WDC_WD2004FBYZ-01YCBB1_SN001-part3
Shutdown Proxmox and physically remove the old disk.
Then tell proxmox to forget the missing drive(s):
1
proxmox-boot-tool clean
6. Repeat for subsequent drives
Follow steps 1 through 5, being careful to change the relevant parts of the commands to match the different drive information, like replacing sdc instead of sda.
7. Grow the zfs pool
Once both old disks are removed and both replacements are fully resilvered, and the only drives left in the mirror are the larger drives:
Enable auto-expand (optional but recommended):
1
zpool set autoexpand=on rpool
Trigger expansion manually if needed:
zpool online -e rpool /dev/disk/by-id/ata-WDC_WD142KRYZ-01CMKB0_SN003-part3
That triggers ZFS to resize the vdev to use all available space.
Check new size:
1
zpool list
Optionally, once the Drives are expanded, you may want to turn auto-expand back off
1
zpool set autoexpand=off rpool