Proxmox VE Setup Guide - Detailed Explanation
A step-by-step Proxmox VE setup guide covering installation, storage configuration, networking, maintenance, and troubleshooting for a reliable virtualization server.
Proxmox Installation, Configuration, and Best Practices - v20260710
A Brief Speedrun version of this article can be found here:
https://mikesco3.github.io/posts/proxmox-setup-guide
Before We Begin
Introduction — Why, What For
Proxmox VE is a powerful open-source hypervisor platform that allows us to create and manage virtual machines (VMs) with ease. It’s a versatile solution suitable for everything from a single standalone host to a small cluster of redundant servers.
In many ways, Proxmox offers the sweet spot between performance, openness, and cost-effectiveness. While it may not match VMware ESXi in polish or certain enterprise features, it more than makes up for it through transparency, flexibility, and the freedom to adapt the system to our own needs — without vendor lock-in or expensive licensing.
The foundation of this setup is built around data protection, reliability, and flexibility. By combining Proxmox with the ZFS filesystem (often called the “billion-dollar file system”) and Sanoid/Syncoid for automated snapshots and replication, we can:
- Protect against ransomware or hardware failure by maintaining frequent, versioned snapshots.
- Easily roll back or clone entire VMs and containers when needed.
- Replicate data offsite for disaster recovery — even between geographically distant locations.
- Detach software from hardware, allowing the same workloads to outlive any particular physical server.
- Take advantage of hardware passthrough, letting us assign specific PCI devices (like GPUs, phone cards, or USB controllers) directly to VMs for near-native performance — without losing the flexibility to back up, recover, migrate, or rebuild VMs even if hardware changes.
This setup has proven especially effective for small-to-mid-size business environments that need enterprise-grade reliability without enterprise-level costs or vendor lock-in.
In this guide, we’ll walk through our current Proxmox configuration — explaining not only how to build it, but why certain choices were made along the way. Whether you’re deploying your first Proxmox node or refining an existing one, the goal is to achieve a setup that is: robust, maintainable, and designed with long-term sustainability in mind.
Related Resources:
Hardware Philosophy
Layout and Design Considerations
Before setting up Proxmox, it’s worth pausing to think through the overall hardware design. Our goal is to balance performance, reliability, and recoverability — not to chase benchmark numbers and icreasingly expensive IT budgets.
Regardless of the hardware, our work philosophy should follow a simple rule:
Don’t be evil, and don’t do dumb!
In this setup
| Slot | NAME | MODEL | SERIAL | Size | Role |
|---|---|---|---|---|---|
| 1 | sda | WD-Gold-HD1 | SN1 | 16T | mirror-0 rpool |
| 2 | sdb | WD-Gold-HD2 | SN2 | 16T | mirror-0 rpool |
| nvme0n1 | nvme0n1 | 2TB-Samsung | SN3 | 2TB | fast200 |
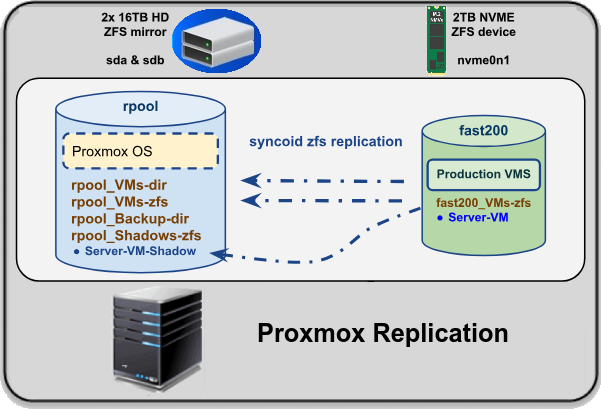
- The main ZFS pool (
rpool) is mirrored across two hard drives. It hosts the Proxmox operating system itself, along with datasets for backups and replicated “shadow” copies of our production VMs. - A second pool (
fast200) lives on a dedicated NVMe drive and runs the live production VMs and containers. This is the high-performance tier that benefits from fast I/O and low latency. - Additional NVMe drives can be introduced later, each forming its own independent pool (for example
fast300,fast400, and so on), following the same structure and replication process when more capacity or isolation is needed. - Replication tasks (using
syncoid) keep the productionfast200pool synchronized to the larger, more resilientrpool, giving us a recoverable copy in case the NVMe drive fails.
Why Mirror and not RAIDZ
RAIDZ1 and RAIDZ2 can squeeze more storage out of 3 (or more) drives, but a mirrored ZFS pool (RAID-1) is a better choice for our Proxmox environment setup.
Mirrors give faster reads and simpler writes, and — most importantly — make recovery straightforward if a drive fails. Recovering from a RAIDZ1 or RAIDZ2 is more complex, puts data at risk during the critical rebuild window, and increases the potential for human error under stress.
With a mirror, we can even do a safe drive rotation: attach a third drive to temporarily form a three-way mirror, let it fully resilver, then detach the oldest drive to store offsite. This keeps a permanent third copy without ever leaving the pool in a risky state — something that wouldn’t be possible with RAIDZ1 or RAIDZ2.
General Hardware Guidelines
- Memory: ZFS uses RAM aggressively for caching and metadata. For light workloads, 32 GB is workable, but 64 GB or more is recommended for multiple VMs or heavier use. Remember that each guest OS also needs its share of memory, so plan with headroom.
- CPU: Favor more cores over high clock speed. Hyper-threading helps, but leave a few threads unassigned so the host has breathing room for background tasks, scrubs, and replication.
- Storage: Use the most reliable drives available for the
rpoolmirror — enterprise or NAS-grade disks if possible (we currently use Western Digital Gold drives). Therpoolis the safety net: we can afford to lose an NVMe drive, but not the mirror that holds our OS and backups (this is a critical line of defense). - ECC Memory: Recommended where available, but not mandatory. In small deployments, regular scrubs and snapshots often provide adequate protection against silent data errors.
- Networking: Gigabit Ethernet is the baseline; 2.5 GbE or higher improves replication speed and remote management responsiveness, especially with large VM images. For best results, dedicate a second network interface to management access — keeping it isolated from production traffic reduces congestion and limits exposure in case of a network issue or compromise.
What to Avoid
- Running ZFS on minimal RAM (below 16 GB) — it will work, but performance and reliability suffer.
- Filling NVMe drives close to capacity — always leave generous free space for wear leveling and ZFS overhead. Overfilled SSDs slow down dramatically and wear out faster.
- Over-allocating CPU cores to VMs — the host must always retain resources for I/O and replication.
- Mixing drives of widely different speeds in a mirror — the faster drive will wait for the slower one every time.
- Treating the NVMe as the “main” data store without replication — always assume it can fail suddenly.
Recap
This layout keeps Proxmox flexible and recoverable. The guiding principle is simple: hardware can fail, but data should never be lost. The drives that make up the rpool deserve the greatest attention and quality because they carry not just the operating system, but the snapshots, backups, and the last line of defense for our data.
We favor mirrors over RAID-Z: Mirrors deliver better performance for both reads and writes, are simpler to manage, and make recovery faster and less error-prone if a drive fails.
Even with mirrored drives and replication, this covers only two parts of the 3-2-1 backup strategy — the redundant local copy (RAID) and the onsite backup (replication). The third element is an offsite or cloud backup, which completes the safety net. RAID and replication protect against hardware failure, but they are not backups. Periodic offsite replication or cloud sync closes that final loop of protection.
Used workstation-class systems often make excellent Proxmox hosts. A single-socket or dual-socket machine from the used market can deliver tremendous value — often for a fraction of its original cost — and with reliable (Brand New Enterprise-Class) drives, we can afford occasional hardware failures as long as the data remains intact.
By combining dependable drives, ZFS snapshots and replication, and Proxmox virtualization, we create a system that’s both resilient and cost-effective — one that trades expensive proprietary backup solutions for open tools that preserve our ability to recover, replicate, and keep running long after the hardware has changed.
Installing Proxmox
With theoretical part out of the way, we can move on to installing Proxmox itself.
These commands are meant to be read, understood, and adapted (not just copy-pasted). Think of this as a recipe that keeps improving over time, and feel free to refine it for your own setup or share any insights back.
Prepare the Hardware
- Visually inspect the system.
- Clean out dust; check the heatsink compound.
- Measure the voltage of the CMOS battery (replace if 3 Volts or below).
- Upgrade the BIOS to the latest version before you begin.
- Reconfigure the BIOS (enable virtualization options such as Intel VT-x/AMD-V and IOMMU).
- Test RAM using memtest86+.
- Install the hard drives.
You may need to upgrade the BIOS by booting the machine into Windows one last time before installing Proxmox.
Install Proxmox with Defaults
Install Proxmox using mostly default settings.
When selecting the drives, choose ZFS and create a RAID-1 mirror using the two 16 TB Western Digital Gold drives.
Be intentional during the installer’s storage selection — it may automatically include all detected drives. Select only the two HDDs for the ZFS mirror.
Optionally, you can set compression to
zstd, and ensure the ashift value is 12 (for 4 K-sector drives).
You may want to leave the NVMe drive unplugged for now — we’ll suggest when to connect it later.
When you reboot into the system for the first time, verify your setup by running the following command. The output should look similar to this:
1
2
3
4
5
6
7
8
9
root@pve0:/dev/disk/by-id# zpool status

  pool: rpool
 config:
        NAME
        rpool
          mirror-0
            ata-WDC_WD161KRYZ-01_XXXX-part3
            ata-WDC_WD161KRYZ-02_XXXX-part3
At this stage, Proxmox should be running from the ZFS mirror (rpool), providing redundancy for the operating system and forming the foundation for our shadow and backup datasets.
Run the Proxmox Helper Scripts
At this point, we should be fully booted into the new Proxmox installation.
If the system doesn’t start correctly after rebooting, check the Troubleshooting section below before continuing.
Run the Proxmox Helper Scripts:
As a general rule: always review any script from the internet before running it — and apply this rule to every script we
curlintobashorgit cloneinto our system throughout this guide.
1
2
bash -c "$(curl -fsSL https://raw.githubusercontent.com/community-scripts/ProxmoxVE/main/tools/pve/post-pve-install.sh)"
This community-maintained script automates a few important post-installation steps:
- Disable the enterprise repositories.
- Enable the no-subscription repositories.
- Disable the subscription nag screen.
- Do not update yet — we’ll handle updates manually in the next step.
Install Basic Linux packages
These packages are mostly general purpose utilities that cover everyday Linux tasks: networking, storage, monitoring, and general admin tools for smooth system management.
1
2
apt update && apt upgrade -y && \
apt install -y archivemount ethtool fastfetch fio git htop iftop iperf3 kpartx libcapture-tiny-perl libconfig-inifiles-perl libsasl2-modules lshw lzop make mbuffer mc ncdu net-tools nfs-kernel-server ntfs-3g pv pv rpcbind samba screen smartmontools speedtest-cli sshfs sudo sysstat tldr-py tmux unzip vim
Then Reboot
This would be a good chance to install the NVMe drive, in which case, run:
poweroff
Configure ZFS Storage
With the system back on, we can now create the ZFS datasets that will organize how storage is used and replicated.
Create ZFS Datasets
We like to create separate datasets for _VMs, _Backup, and _Shadows to keep things organized and give ourselves flexibility down the road. (This gives us more control than relying on Proxmox’s default dataset structure.)
_VMsholds active virtual machines, keeping them separate from backups and replications._Backupstores Proxmox backups, ISO files, and will be shared via Samba — isolating it makes sharing safer and simpler._Shadowsreceives periodic ZFS replications from production VMs running on the fast NVME drives (fast200). Separating these “shadow” copies from both active and archived VMs.
Each dataset serves a specific role in keeping live data, replicated copies, and backups separate — both for organization and for resilience.
By structuring storage this way, we can assign different snapshot policies with sanoid, move or archive VMs between storage tiers without disrupting other datasets, and keep my options open for future upgrades or migrations. It’s a way of thinking ahead: separating concerns now makes troubleshooting, replication, and scaling much easier later.
Create _VMs Dataset
1
2
3
4
5
zfs create \
  -o atime=off \
  -o compression=zstd \
  -o casesensitivity=mixed \
  rpool/_VMs
Create _Backup Dataset
1
2
3
4
5
zfs create \
  -o atime=off \
  -o compression=zstd \
  -o casesensitivity=mixed \
  rpool/_Backup
Optionally, create a symbolic link at the filesystem root for easy access.
1
ln -s /rpool/_Backup/ /_Backup
Create _Shadows Dataset
1
2
3
4
5
zfs create \
  -o atime=off \
  -o compression=zstd \
  -o casesensitivity=mixed \
  rpool/_Shadows
Create the symbolic.
1
ln -s /rpool/_Shadows/ /_Shadows
Create the fast200 SSD Pool
Before continuing, ensure the NVMe drive is connected and check how it’s labeled in your system.
We can usually identify it using
lsblk, or in more detail:
lsblk -o name,model,serial
In our example we will refer to it as /dev/nvme0n1
Leave Room for SSD Over-Provisioning
Over-provisioning gives the SSD extra space to maintain performance and extend lifespan. We’ll reserve about 15% of the drive capacity for this purpose.
Next, we’ll create a partition on the NVMe drive using cfdisk, a simple text-based tool for partitioning disks. This will let us set up the SSD for ZFS and in our example we will only assign 85% of the space leaving 15% room for over-provisioning.
(you can find this out by multiplying the total by .85 )
1
cfdisk /dev/nvme0n1
- create a
gptpartition table - create a primary partition of type:
Solaris /usr & Apple ZFS (6A898CC3-1DD2-11B2-99A6-080020736631) - Allocate only 85% of the available space
- Write and quit
cfdisk.
Finally the following command to label the partition:
1
sudo sgdisk --change-name=1:"fast200" /dev/nvme0n1
Create the pool
To ensure the ZFS pool uses the correct device, it’s best to reference the disk by its unique ID rather than /dev/nvme0n1, which can change after a reboot.
You can list disks and their IDs with:
1
ls -l /dev/disk/by-id/ |grep nvme0n1 |grep part1
- Replace
nvme0n1with the actual device name as shown bylsblkon your system.
Look for the entry that matches your NVMe drive — in our example it’s:
nvme-2TB-Samsung_SSD_EVO_2TB_SN0001234-part1.
Now Create the pool with this command:
Caution: Double-check that you’re referencing the correct device before running this command — creating a new pool will erase all data on the selected disk.
1
2
3
4
zpool create fast200 \
  -o ashift=12       \
  -o autotrim=on     \
  nvme-2TB-Samsung_SSD_EVO_2TB_SN0001234-part1
Upgrade and Enable ZSTD Compression
1
2
  zpool upgrade fast200
  zfs set compression=zstd fast200
Create the fast200/_VMs Dataset
1
2
3
4
5
zfs create \
  -o atime=off \
  -o compression=zstd \
  -o casesensitivity=mixed \
  fast200/_VMs
Add Storages to Proxmox
From the Proxmox web interface, go to Datacenter → Storage, then:
- Disable
localandlocal-zfs. - Add the datasets for
fast200_VMs,rpool_Backup,rpool_Shadows, andrpool_VMs.
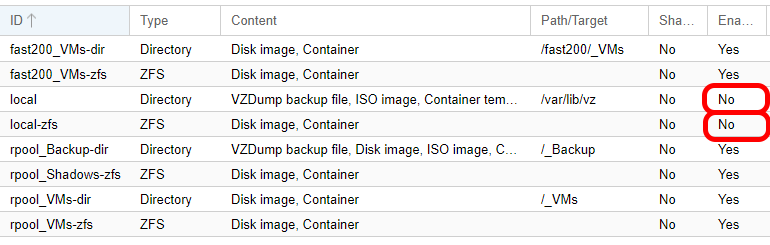
I like to add both the directory and ZFS versions of each storage.
- ZFS storage creates virtual disks as zvols (better for VM performance).
- Directory storage uses QCOW2 files and is required for ISOs and backups (
_Backupmust be a directory).
You can control what each storage type handles by selecting it, clicking Edit, and adjusting the Content dropdown.
Each dataset serves a clear role within the system:
- fast200_VMs — The high-performance tier for live (production) VMs and containers that benefit from low latency and fast I/O.
- rpool_VMs — The capacity tier for larger or less performance-sensitive workloads. Useful for VMs that need large secondary drives (e.g., media libraries, backup targets, or photo archives like Immich).
- rpool_Backup — Stores VZDump backups, ISO images, and templates generated by Proxmox.
- rpool_Shadows — Holds replicated snapshots created by Syncoid, serving as a recovery layer in case the NVMe fails.
1
2
3
4
5
6
7
8
9
10
11
12
13
      ┌───────────────────────────────────────────────┐
      │                   ZFS POOLS                   │
      ├───────────────────────────────────────────────┤
      │                                               │
      │  fast200 (NVMe)     →  High-performance       │
      │    ├─ fast200_VMs   →  Live / active VMs      │
      │                                               │
      │  rpool (HDD mirror) →  Reliability tier       │
      │    ├─ rpool_VMs     →  Large / slow VMs       │
      │    ├─ rpool_Backup  →  VZDump backups & ISOs  │
      │    └─ rpool_Shadows →  Syncoid replicas       │
      │                                               │
      └───────────────────────────────────────────────┘
Tip: Disable
localandlocal-zfsto avoid confusion or accidental writes to/var/lib/vzorrpool/data. Keeping only the custom storages visible helps ensure that all new VMs and backups land on the correct pools.
User Management and Access
Even though Proxmox operates with the root account enabled, it’s not a good habit to get used to operating within linux as root. Creating an administrative user not only adds a layer of safety — helping prevent accidental system-wide changes — but also prepares the system for collaboration down the road.
By creating a dedicated Linux user, we make it possible to:
- Keep root credentials private and rarely used.
- Grant limited or temporary access to others without sharing the main password.
- Disable or remove a user account cleanly when access is no longer needed.
This section also serves as a reference for when we eventually need to create an account for another administrator or collaborator. While this guide won’t go into access restriction policies or fine-grained permissions, simply having a user model that can be expanded or revoked later is already a major step toward a more secure and maintainable setup.
At this stage, we’ll create a Linux user, link it to Proxmox permissions, and configure Samba access for network shares such as _Backup.
Let’s start by creating our first dedicated user — one that we’ll use for day-to-day management instead of logging in directly as root.
Create a Linux User
We’ll begin by creating the new Linux user account that will replace root for most day-to-day administration.
Note: You can adjust the group list depending on the user’s role.
For example, a collaborator who only needs access to Samba shares can be added tousers,sambasharewithout fullsudoprivileges.
In our example, called:
johndoe
1
2
3
4
5
6
sudo useradd -m \
  -s /usr/bin/bash \
  -G adm,sudo,shadow,staff,users,crontab,postfix,sambashare,dip,root \
  johndoe

sudo passwd johndoe
Type a password when prompted (you won’t see characters as you type).
Next, create the same user for Samba access:
1
smbpasswd -a johndoe
This password will be required when connecting from a Windows or macOS workstation.
Add User to Proxmox
Now that our Linux user exists, let’s link it to the Proxmox permission system so it can be used for both web access and SSH.
In the Proxmox Web Interface, create a group (for example,
masters):
Datacenter → Permissions → Groups → Create- Grant that group administrative rights from the command line:
1
pveum aclmod / -group masters -role Administrator
- Then, back in the web interface, create the user:
Datacenter → Permissions → Users → Add and assign the user (e.g. johndoe@pam) to the masters group.
Tip: PAM users are Linux system accounts; PVE users exist only inside Proxmox. Using PAM allows you to manage credentials at the OS level and reuse them for SSH or Samba access.
Samba
Configure Samba
Samba lets us access specific Proxmox datasets — in this case, the _Backup directory — from Windows or other systems.
This makes it easy to copy ISO images (within templates/iso), Proxmox backup files (in the dump folder), or exported configurations to and from the server without using SSH every time.
We’ll create a minimal Samba setup that exposes only the _Backup dataset.
Once you understand this process, you can extend it later to share additional folders if needed.
Backup the original smb.conf file:
Whenever possible, avoid doing something you can’t easily undo.
Before making any edits, create a copy of the default Samba configuration:
1
cp /etc/samba/smb.conf /etc/samba/smb.conf_orig
Edit the Main Configuration
Open /etc/samba/smb.conf and verify or modify the following lines:
Note: This is the only section where we’ll explicitly remind you — always review and understand third-party configuration examples before applying them directly. Adapt these paths, users, and permissions to your specific setup.
1
2
3
4
5
6
7
8
9
workgroup = WORKGROUP

# Under [homes]
read only = no
create mask = 0775
directory mask = 0775

# At the end of the file, include the custom shares file:
include = /etc/samba/shares.conf
This tells Samba to reference a separate configuration file where we’ll define our actual shares.
Create the File /etc/samba/shares.conf
This file will define the individual shares. In this setup, we’re only sharing the _Backup dataset — used for storing Proxmox backups, ISO files, and exported configurations.
1
vim /etc/samba/shares.conf
Example:
1
2
3
4
5
6
7
8
9
10
11
12
13
[.Backup$]
   comment = Proxmox Backup Share
   path = /rpool/_Backup
   browseable = no
   guest ok = no
   read only = no
   valid users = johndoe, @staff, @adm
   admin users = johndoe, @adm
   force user = johndoe
   force group = adm
   create mask = 0660
   directory mask = 2770
   case sensitive = no
The
$suffix andbrowseable = nokeep the share hidden from normal Windows browsing.force userandforce groupensure all files are created with consistent ownership, keeping permissions predictable and maintenance simple.
Finally, set the adequate permissions:
1
chmod 644 /etc/samba/shares.conf  # Ensure correct permissions
Set Folder Permissions
Ensure that the shared directory has the correct ownership and group permissions:
1
2
chown :sambashare --recursive /rpool/_Backup
chmod g+rwx --recursive /rpool/_Backup
Final Check and Start the Service
Before starting Samba, verify that the configuration is valid:
1
testparm   # Checks for syntax errors and lists available shares
If no errors appear, enable and start the service:
1
2
systemctl enable --now smbd nmbd
systemctl status smbd nmbd
From a Windows or macOS system, test access to the share:
1
2
3
\\proxmox-server\.Backup$
or
\\<proxmox-ip>\.Backup$
Try creating a small test file or folder, then delete it to confirm that your user has proper read/write permissions. Once verified, remove the test item to keep the share clean.
If authentication succeeds, you should now have full access to the _Backup share.
If not, trace back your steps and double-check for any typos or skipped commands — Samba is very particular about syntax and permissions.
Additional Software & Tools
At this point the Proxmox host is fully functional. The remaining tools aren’t required to run the system, but they significantly improve its resilience and reduce the amount of manual administration required over time.
The two tools that most influence the design described in this guide are Sanoid and Syncoid.
Sanoid & Syncoid
One of the primary goals of this setup is to make recovery both fast and predictable.
To accomplish that, we rely on Sanoid to manage automatic ZFS snapshots and Syncoid to replicate selected datasets from the high-performance NVMe pool (fast200) to the mirrored hard-drive pool (rpool/_Shadows).
Together they provide three important capabilities:
- Frequent, automatic snapshots
- Efficient incremental replication
- Fast recovery from both hardware failures and user mistakes
Each tool serves a different purpose:
sanoidfor Snapshots: protect against accidental deletion, software bugs, corruption, or ransomware.syncoidfor Replication: protects against storage device failure by maintaining an independent copy of important datasets.
Neither replaces a proper off-site backup, but together they provide an excellent second layer of protection.
Remember: RAID provides availability, snapshots provide history, replication provides redundancy, and backups provide disaster recovery.
Install Sanoid
Recent versions of Debian and Proxmox include Sanoid directly in the package repositories, making installation straightforward.
1
2
apt update
apt install -y sanoid
This installs both Sanoid and Syncoid.
Configure Snapshot Policies
Create the configuration directory if necessary:
1
mkdir -p /etc/sanoid
A sample configuration file is available from the Sanoid project:
1
2
wget https://raw.githubusercontent.com/jimsalterjrs/sanoid/master/sanoid.conf \
    -O /etc/sanoid/sanoid.conf
The GitHub repository for this article includes a sample
sanoid.confbased on the configuration I use in my own environments.Adjust the snapshot retention policies based on your available storage capacity and your recovery requirements.
- https://raw.githubusercontent.com/Mikesco3/Mikesco3.github.io/refs/heads/main/_posts/_samples/sanoid.conf
Enable Automatic Snapshots
Enable the timer:
1
2
systemctl enable --now sanoid sanoid-prune
systemctl status sanoid sanoid-prune sanoid.timer
Once enabled, Sanoid will begin creating and pruning snapshots according to your configuration.
Syncoid: Replicating Production Storage
Snapshots are only half of the strategy.
I also replicate selected production virtual disks from the fast200 pool into rpool/_Shadows using Syncoid. Rather than replicating every dataset automatically, I prefer to explicitly list the virtual disks that should be protected.
Create the Shadow VM:
Once we have Production VMs we can setup replication to their Shadow Equivalents:
In this example we will replicate
VM 201to aShadow VM 1201
- Copy the VM Config file in
/etc/pve/qemu-server/from201.confto1201.conf - Change the Shadow VM drive entries:
- In
/etc/pve/qemu-server/1201.conf
Example:
from:
fast200vm 201
efidisk0: fast200_VMs-zfs:vm-201-disk-0,efitype=4m,pre-enrolled-keys=1,size=1M
tpmstate0: fast200_VMs-zfs:vm-201-disk-1,size=4M,version=v2.0
virtio0: fast200_VMs-zfs:vm-201-disk-2,discard=on,iothread=1,size=150G
To:
_Shadowvm 1201.
efidisk0: rpool_Shadows-zfs:vm-1201-disk-0,efitype=4m,pre-enrolled-keys=1,size=1M
tpmstate0: rpool_Shadows-zfs:vm-1201-disk-1,size=4M,version=v2.0
virtio0: rpool_Shadows-zfs:vm-1201-disk-2,discard=on,iothread=1,size=150G
- Disable the network interfaces of the Shadow VM 1201:
Schedule The Script
I then schedule this script from crontab:
5 8-18/2 * * * /root/replicateVMs-to-Shadows.sh >/dev/null 2>&1
This example runs every two hours during the workday, but the schedule should reflect your own recovery objectives and how frequently your data changes.
For more advanced scheduling checkout crontab.guru):
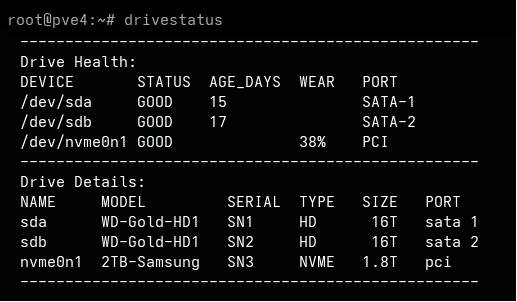
DriveStatus
Knowing which drive is which becomes surprisingly important once a server has multiple disks. A SMART warning isn’t very helpful if you can’t immediately identify the physical drive that needs attention.
I wrote drivestatus after finding myself repeatedly jumping between lsblk, smartctl, and /dev/disk/by-id just to identify a failing drive.
Install it with:
1
2
3
sudo wget -O /usr/bin/drivestatus \
  https://raw.githubusercontent.com/Mikesco3/drivestatus.sh/main/drivestatus.sh && \
sudo chmod +x /usr/bin/drivestatus
As with any third-party script, take a few minutes to review the source before installing it. Understanding what a script does is always better than blindly piping commands into your system.
Once installed, simply run:
1
drivestatus
I typically use it after installing new drives, before replacing a failed disk, and as part of routine maintenance alongside scheduled ZFS scrubs.
Example output (model names and serial numbers anonymized):
Remote Access Options
For securely accessing your Proxmox server remotely, consider using one of these VPN/overlay network solutions:
- ZeroTier — Easy-to-use virtual network overlay that connects devices as if they were on the same LAN.
- Tailscale — Simple mesh VPN built on WireGuard with easy device management.
- NetBird — Open-source mesh VPN built on WireGuard with a self-hosting option.
- WireGuard — Lightweight, high-performance VPN protocol for building your own secure tunnels.
- Nebula — Open-source mesh networking solution designed for secure connectivity between hosts.
ZeroTier Install
1
curl -s https://install.zerotier.com | sudo bash
After installation, log in to my.zerotier.com, create or configure your network, and authorize additional devices to join.
Maintenance
Schedule Regular ZFS Scrubs
One of ZFS’s greatest strengths is that every block of data is protected by a checksum. Unlike traditional filesystems, ZFS can detect when data has silently become corrupted—a phenomenon often called bit rot.
However, ZFS can only verify data that it actually reads.
A scrub forces ZFS to read every block in the pool, verify its checksum, and, if the pool is mirrored, automatically repair any corrupted blocks using the healthy copy. Without regular scrubs, corruption can remain undetected for months or even years until the affected file is finally accessed—sometimes when it’s already too late.
In short:
- Snapshots protect against accidental changes or ransomware.
- Replication protects against device failure.
- Scrubs verify that your backups and replicas are still healthy.
I recommend scheduling a weekly scrub during off-hours. For this setup, I stagger the pools so they don’t compete for disk bandwidth.
Run crontab -e as root and add:
0 06 * * SUN /usr/sbin/zpool scrub fast200
2 06 * * SUN /usr/sbin/zpool scrub rpool
This schedules:
- 06:00 every Sunday — scrub the
fast200NVMe pool. - 06:02 every Sunday — scrub the mirrored
rpool.
For more advanced scheduling checkout crontab.guru
Note: ZFS will skip blocks that are already in use by another scrub, so scheduling them a couple of minutes apart simply avoids starting both jobs at exactly the same instant.
You can monitor the progress of a scrub at any time with:
1
zpool status
A healthy pool should eventually report something similar to:
1
2
scan: scrub repaired 0B in ...
errors: No known data errors
Don’t skip scrubs. They’re one of the simplest maintenance tasks you can automate, yet they can detect and repair silent corruption long before it becomes a restore-day surprise.
Verify Replication
Recommendation
Frequency: Every 6–12 months.
Review the entire replication chain rather than assuming it is working.
- Boot one or more replicated (“Shadow”) virtual machines.
- Verify that replication jobs are still running successfully.
- Confirm that recent snapshots exist on both the source and destination datasets.
- Check available storage capacity and adjust your
sanoid.confretention policies if needed.
Why
Replication can fail quietly. A failed replication job may go unnoticed for months until you actually need it.
Periodically verifying that your replicated datasets are current—and that the replicated VMs are actually bootable—provides confidence that your recovery plan will work when it matters most.
Disaster Recovery Drills
Recommendation
Frequency: Every 1–2 years.
Treat disaster recovery like a fire drill.
- Perform a complete restore of one or more virtual machines.
- If practical, perform a full bare-metal recovery onto different hardware.
- Verify that you can recover the system using only your documentation.
- Update your documentation with anything you learned during the exercise.
Why
Backups are only as valuable as your ability to restore them.
A disaster recovery drill exposes missing documentation, forgotten passwords, outdated assumptions, and recovery steps that only become apparent under pressure. It is far better to discover these issues during a planned exercise than during an actual outage.
Keep Proxmox Updated
Recommendation
Frequency: Every 6–12 months, especialy if there is a vulnerability disclosure.
Apply updates regularly rather than allowing them to accumulate.
Review and update:
- Proxmox VE packages
- Debian packages
- BIOS and firmware
- RAID, HBA, or NVMe firmware (when applicable)
- Virtual machine operating systems
- Critical applications running inside the VMs
Before major upgrades:
- Verify recent backups.
- Create Snapshots if Need be.
- Confirm replication is current.
- Read the Proxmox release notes.
Why
Smaller, regular updates are generally easier to troubleshoot than performing years’ worth of upgrades all at once. Keeping systems current also reduces security exposure and makes future upgrades less disruptive.
Backup Strategy
Recommendation
Frequency: Every 6–12 months, especialy before and after major software version changes.
Maintain multiple independent copies of important data.
Consider maintaining:
- Offline backups stored on removable media.
- Off-site backups.
- Cloud or remote NAS replication.
- Periodic full-system images in addition to snapshot replication.
Why
A mirrored ZFS pool protects against disk failure.
Snapshots protect against accidental deletion and ransomware.
Replication protects against hardware failure.
None of these protect against fire, theft, lightning, or catastrophic site loss.
A proper backup strategy follows the 3-2-1 principle whenever practical.
The 3-2-1 Backup Rule: Three total copies, on two different media types, with one stored offsite
Hard Drive Age
Recommendation
Frequency: every 4–6 years.
- Consider replacing hard drives before the end of the warranty period, especially in production systems.
If replacing multiple drives in a mirrored pool, stagger replacements whenever practical.
Why
Hard drives are mechanical devices with finite service lives.
Replacing every drive at the same time increases the chance of receiving multiple drives from the same manufacturing batch. Staggered replacements reduce exposure to latent manufacturing defects while leaving you with emergency spare drives that still have useful life remaining.
NVMe SSD Wear & Replacement
Recommendation
Periodic Review (Every 6–12 months)
- Review SMART health and wear indicators.
- Verify that normal datastore utilization remains below 75–85%.
- Confirm that approximately 15% of the SSD remains unallocated to provide additional over-provisioning.
Lifecycle Replacement (Typically Every 2–5 years)
- Plan to replace heavily-used NVMe drives before they reach the end of their expected service life.
- Consider the drive’s age, SMART wear indicators, Total Bytes Written (TBW) or endurance rating, workload history, and remaining warranty when determining replacement timing.
Why
Virtualization hosts generate significantly more write activity than a typical desktop system, accelerating SSD wear.
Keeping datastore utilization below 75–85% and leaving approximately 15% of the SSD unallocated gives the controller additional space for wear leveling and garbage collection, helping maintain consistent performance while reducing write amplification.
Replacing drives proactively—before they exceed their endurance rating or approach the end of their warranty—reduces the risk of unexpected failures and keeps storage performance predictable.
CMOS Battery
Recommendation
Frequency: Every 2–3 years.
Measure the CMOS battery with a voltmeter during routine maintenance.
Replace it:
- if the voltage measures 3.0 V or lower,
- if it is more than 5 years old, or
- if the system begins losing BIOS settings or the system clock after power loss.
Note: Many motherboards will retain their CMOS settings if AC power remains connected while the battery is replaced. This can avoid reconfiguring BIOS settings, but it also increases the risk of accidentally shorting the motherboard while handling the battery. Choose the approach that best matches your environment and risk tolerance.
Why
A weak CMOS battery can cause BIOS settings, boot order, and the system clock to reset after power loss, resulting in confusing failures that are inexpensive to prevent.
Memory Testing
Recommendation
Frequency: Every 2–3 years, or if noticing random server issues.
Run a full MemTest whenever unexplained crashes occur and periodically as systems age.
Why
ZFS depends heavily on system memory.
Faulty RAM can silently corrupt data before it is ever written to disk. Memory errors are uncommon but become more likely as hardware ages.
Physical Inspection
Recommendation
Inspect the server at least once each year.
- Remove accumulated dust.
- Check temperatures.
- Listen for failing fans.
- Verify all fans are spinning normally.
- Look for loose cables, corrosion, or heat damage.
Hold fan blades stationary while blowing out dust. Allowing compressed air to spin fans at excessive speed can permanently damage their bearings.
Why
Many hardware failures give subtle warning signs long before monitoring software detects a problem. A simple visual inspection often catches issues before they become outages.
Lifecycle & Redundancy Planning
Recommendation
Whenever practical, replace equipment before it becomes critical and keep recently retired hardware as tested spares.
Consider maintaining spare:
- switches
- storage drives
- power supplies
- network adapters
- an additional Proxmox host for replication or emergency failover
Why
The best time to acquire replacement hardware is before you need it.
Keeping known-good spare equipment dramatically reduces recovery time during an outage and allows hardware failures to become routine maintenance events instead of emergencies.
Troubleshooting
Installer Fails to Boot
On some systems, particularly those with newer GPUs or unusual graphics hardware, the Proxmox installer may freeze or display a blank screen before reaching the installation menu.
This is often caused by a framebuffer or graphics driver compatibility issue during the early boot process.
A common workaround is to edit the boot parameters from the installer menu:
- Highlight the Proxmox installer entry.
- Press
eto edit the boot options. - Remove:
1
quiet splash=silent
- Add:
1
nomodeset
If nomodeset alone doesn’t resolve the issue, you can also try:
1
nomodeset vesafb
These options disable kernel mode-setting and fall back to a more generic framebuffer driver, allowing the installer to boot on hardware that doesn’t cooperate with the default graphics initialization.
This only affects the installer boot process. Once Proxmox is installed, these options are usually not required and can be removed.
Reference
- Proxmox Forum: Framebuffer Configuration
https://forum.proxmox.com/threads/framebuffer-configuration.112372/post-484826
USB Keyboard or KVM Stops Working
On some systems, particularly those using USB KVM switches, keyboard and mouse devices may stop working after a kernel update or reboot even though the devices themselves appear to be connected.
In my case, the issue was caused by the hid_logitech_dj kernel module, which was incorrectly claiming ownership of the keyboard connected through the USB KVM. As a result, keyboard input never reached the host.
A simple workaround is to blacklist the module:
1
2
3
echo "blacklist hid_logitech_dj" >> /etc/modprobe.d/pve-blacklist.conf && \
update-initramfs -u && \
pve-efiboot-tool refresh
Reboot the system after making the change.
Note: This fix is only applicable if the problem is caused by the Logitech HID driver. If your keyboard is connected directly to the host (without a KVM) or uses a different chipset, the root cause may be different.
This issue was encountered while using a USB KVM switch with Proxmox after a system update. If your keyboard stops responding immediately after boot but the system otherwise appears healthy, this is worth checking.
No Network After an Update or Reboot
If your Proxmox host boots normally but the network never comes online, one possible cause is that Linux has renamed one or more network interfaces. Since Proxmox bridges (such as vmbr0) are usually bound to a specific interface name, a renamed NIC prevents the bridge from starting, making the host appear disconnected.
Verify the Interface Name
First, inspect the logs from the current boot for any messages related to renamed interfaces:
1
journalctl -b
Then list the available network interfaces:
1
ip link
or
1
ip addr
Compare the interface names against your network configuration:
1
cat /etc/network/interfaces
If the bridge (vmbr0) references an interface that no longer exists (for example, enp3s0 was renamed to eno1), simply update the configuration with the correct interface name and restart networking or reboot the host.
Permanent Solution: Pin Interface Names
If this happens repeatedly, you can instruct systemd to permanently associate each network adapter’s MAC address with a specific interface name.
The following script generates .link files for each physical interface under /tmp:
1
2
3
4
5
6
7
8
9
10
11
12
13
14
15
16
17
18
19
#!/bin/bash

OUTDIR=/tmp

for ETH in $(ls -1 /sys/class/net/ | sort -V | grep -v -e "^bond" -e "^fwbr" -e "^fwln" -e "^fwpr" -e "^lo$" -e "^tap" -e "^vmbr")
do
    echo "-------------------------"
    echo "[Match]" > ${OUTDIR}/10-${ETH}.link
    echo -n "MACAddress=" >> ${OUTDIR}/10-${ETH}.link
    ip link show dev ${ETH} | awk '/link\/ether/ {print $2}' >> ${OUTDIR}/10-${ETH}.link
    echo "Type=ether" >> ${OUTDIR}/10-${ETH}.link
    echo "" >> ${OUTDIR}/10-${ETH}.link
    echo "[Link]" >> ${OUTDIR}/10-${ETH}.link
    echo "Name=${ETH}" >> ${OUTDIR}/10-${ETH}.link

    cat ${OUTDIR}/10-${ETH}.link
done

echo "-------------------------"
Review the generated files carefully. If they look correct, copy them into:
1
/etc/systemd/network/
Finally, rebuild the initramfs so the new interface naming rules are included during boot:
1
update-initramfs -u -k all
This creates persistent interface names based on each adapter’s MAC address, preventing unexpected renaming after future updates or hardware changes.
References
- Proxmox Forum: The Joys of Spontaneous Interface Renaming
https://forum.proxmox.com/threads/the-joys-of-spontaneous-network-interface-renaming.153817/post-699566
- Proxmox VE Administration Guide: Override Device Names
https://pve.proxmox.com/pve-docs/pve-admin-guide.html#network_override_device_names
- Proxmox Forum: Network State Down After Update Reboot
https://forum.proxmox.com/threads/network-state-down-after-update-reboot.130708/
Network Randomly Hangs (e1000e Hardware Unit Hang)
Some systems using Intel network adapters driven by the e1000e kernel module may occasionally lose network connectivity under sustained load while the host itself continues running normally.
The kernel log typically contains messages similar to:
1
2
3
e1000e ... Detected Hardware Unit Hang
NETDEV WATCHDOG: transmit queue timed out
Reset adapter unexpectedly
This issue has been observed on a variety of older Intel Gigabit adapters and is generally caused by hardware offloading features interacting poorly with the e1000e driver. The most common workaround is to disable the affected offloading features.
Fortunately, the Proxmox community provides a helper script that detects Intel e1000e interfaces and applies the recommended settings automatically.
1
bash -c "$(curl -fsSL https://raw.githubusercontent.com/community-scripts/ProxmoxVE/main/tools/pve/nic-offloading-fix.sh)"
As always, review any script before running it on your system. Understanding what a script changes is better than blindly executing commands from the Internet.
If you’re interested in the technical details or prefer to apply the workaround manually, see the references below.
References
- Proxmox forum discussion on the
e1000ehardware unit hanghttps://forum.proxmox.com/threads/intel-nic-e1000e-hardware-unit-hang.106001/page-4
- Proxmox Community Scripts: Intel NIC Offloading Fix
https://community-scripts.org/scripts/nic-offloading-fix?id=nic-offloading-fix
Conclusion
The goal of this guide wasn’t to cover every Proxmox feature or every possible deployment. Instead, I wanted to document a setup that has proven reliable in real-world use—one that emphasizes recoverability, maintainability, and protecting data over chasing the latest hardware or the highest benchmark numbers.
Like most infrastructure, this setup continues to evolve. As I learn better approaches or discover useful tools, I’ll update this guide to reflect those improvements rather than treating it as a static snapshot in time.
If you’ve built a similar Proxmox environment or have ideas that could improve this guide, I’d love to hear about them. One of the strengths of open-source software is that we all benefit by sharing what we’ve learned.
Contact me in LinkedIn or by email with questions or suggestions.
- LinkedIn: https://www.linkedin.com/in/mikesco3/