Proxmox VE Setup Guide - Speedrun
A Proxmox Installation Speedrun that assumes the reader already understands the concepts from the Detailed Proxmox VE setup guide.
Proxmox Installation, Speedrun - v20260710
Need the explanations and design decisions? Read the full guide.
https://mikesco3.github.io/posts/proxmox-setup-guide/
In this setup
We will set up Proxmox VE using the following layout:
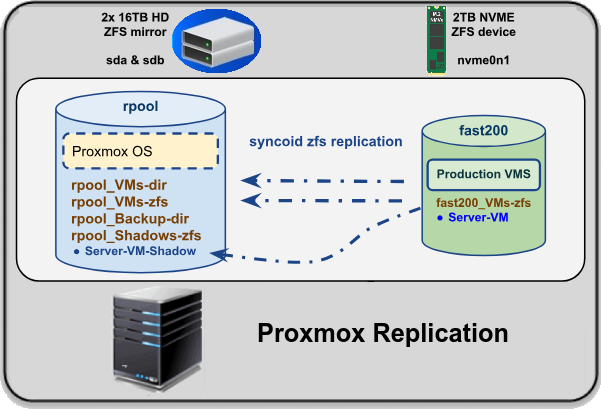
- The main ZFS pool (
rpool) is mirrored across two hard drives. It hosts the Proxmox operating system itself, along with datasets for backups and replicated “shadow” copies of our production VMs. - A second pool (
fast200) lives on a dedicated NVMe drive and runs the live production VMs and containers. This is the high-performance tier that benefits from fast I/O and low latency. - Additional NVMe drives can be introduced later, each forming its own independent pool (for example
fast300,fast400, and so on), following the same structure and replication process when more capacity or isolation is needed. - Replication tasks (using
syncoid) keep the productionfast200pool synchronized to the larger, more resilientrpool, giving us a recoverable copy in case the NVMe drive fails.
These commands are meant to be read, understood, and adapted (not just copy-pasted). Think of this as a recipe that keeps improving over time, and feel free to refine it for your own setup or share any insights back.
1. Hardware Checklist
- Clean out dust; check the heatsink compound.
- Check CMOS battery (replace if ≤ 3.0 V)
- Update BIOS
- Configure BIOS (Enable VT-x/AMD-V and IOMMU)
- Install drives
- Check the RAM with
memtest
2. Install Proxmox
- Boot into the installation media and choose:
- Filesystem: ZFS
- Layout: RAID1 (mirror)
- Select only the two HDDs
- Set compression=zstd (optional)
Set
ashift=12- Proceed with the install and reboot
3. Helper Script
- Run the PVE Post-Install Script
1
bash -c "$(wget -qLO - https://github.com/community-scripts/ProxmoxVE/raw/main/misc/post-pve-install.sh)"
- disable enterprise repo,
- enables no-sub repo,
- kill subscription nag,
- disable corosync and clustering
- DON’T Update yet
4. Install Basic Tools
1
2
apt update && apt upgrade -y && \
apt install -y libcapture-tiny-perl libconfig-inifiles-perl pv lzop mbuffer net-tools sudo mc unzip screen iftop lshw sshfs make nfs-kernel-server sysstat smartmontools ethtool pv htop ntfs-3g git samba rpcbind libsasl2-modules neofetch ncdu vim tmux iperf3 archivemount fio kpartx tldr speedtest-cli
Note: Adjust for your package preference or fix any missing packages
- Reboot
5. Create ZFS Datasets
Create separate datasets for _Backup, _Shadows, and _VMs.
1
2
3
4
5
6
7
zfs create -o atime=off -o compression=zstd -o casesensitivity=mixed rpool/_Backup
ln -s /rpool/_Backup/ /_Backup

zfs create -o atime=off -o compression=zstd -o casesensitivity=mixed rpool/_Shadows
ln -s /rpool/_Shadows/ /_Shadows

zfs create -o atime=off -o compression=zstd -o casesensitivity=mixed rpool/_VMs
Verify Everything
1
2
3
4
5
zpool status
zfs list
lsblk
pvesm status
6. Create NVMe Pool
- Install the NVMe Drive.
- Locate the NVMe drive
1
lsblk -o name,model,serial
Partition the NVMe Drive
Warning: Do NOT blindly copy the device names shown in this guide. Confirm the correct NVMe device using the previous commands and substitute those values before creating the pool.
1
cfdisk /dev/nvme0n1
- create a
gptpartition table - create a primary partition of type:
Solaris /usr & Apple ZFS (6A898CC3-1DD2-11B2-99A6-080020736631)
- Only allocate 85% of total capacity, leaving room for over-provisioning.
- Write and quit
cfdisk.
Finally the following command to label the partition:
1
sudo sgdisk --change-name=1:"fast200" /dev/nvme0n1
You can list disks and their IDs with:
1
ls -l /dev/disk/by-id/ |grep nvme0n1 |grep part1
Create the pool
Danger: Creating a ZFS pool destroys all data on the selected device. Double-check the device identifier before pressing Enter.
1
2
3
4
5
6
7
8
zpool create fast200 \
  -o ashift=12       \
  -o autotrim=on     \
  nvme-2TB-Samsung_SSD_EVO_2TB_SN0001234-part1

zpool upgrade fast200
zfs set compression=zstd fast200
Create the fast200/_VMs Dataset
1
2
3
4
5
zfs create                 \
  -o atime=off             \
  -o compression=zstd      \
  -o casesensitivity=mixed \
  fast200/_VMs
Schedule ZFS Scrubs
Run crontab -e as root and add:
0 06 * * SUN /usr/sbin/zpool scrub fast200
2 06 * * SUN /usr/sbin/zpool scrub rpool
7. Add Storages in Proxmox
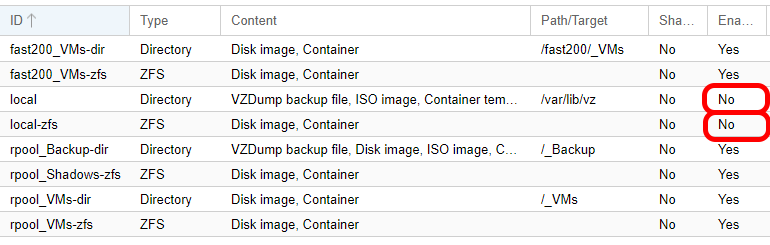
Datacenter → Storage
- Disable:
localandlocal-zfs - Add:
fast200/_VMs,rpool/_Backup,rpool/_Shadowsandrpool/_VMs
8. Create an Admin User
Create the User in Linux User:
In our example, called:
johndoe
1
2
3
4
5
6
sudo useradd -m \
  -s /usr/bin/bash \
  -G adm,sudo,shadow,staff,users,crontab,postfix,sambashare,dip,root \
  johndoe

sudo passwd johndoe
- Create the same user for Samba access:
1
smbpasswd -a johndoe
Add the User to Proxmox
In the Proxmox Web Interface, create a group (for example,
masters):
Datacenter → Permissions → Groups → Create- Grant that group administrative rights from the command line:
1
pveum aclmod / -group masters -role Administrator
- Then, back in the web interface, create the user:
Datacenter → Permissions → Users → Add and assign the user (e.g. johndoe@pam) to the masters group. __ __
9. Configure Samba
- Backup Samba config first
1
cp /etc/samba/smb.conf /etc/samba/smb.conf_orig
Edit the Main Configuration
- Open
/etc/samba/smb.conf, and edit the following lines:
1
2
3
4
5
6
7
8
9
workgroup = WORKGROUP

# Under [homes]
read only = no
create mask = 0775
directory mask = 0775

# At the end of the file, include the custom shares file:
include = /etc/samba/shares.conf
Add the Shares
- Create
/etc/samba/shares.confand add the Shares:
Example:
1
2
3
4
5
6
7
8
9
10
11
12
13
[.Backup$]
   comment = Proxmox Backup Share
   path = /rpool/_Backup
   browseable = no
   guest ok = no
   read only = no
   valid users = johndoe, @staff, @adm
   admin users = johndoe, @adm
   force user = johndoe
   force group = adm
   create mask = 0660
   directory mask = 2770
   case sensitive = no
Set the Permissions
1
2
3
4
chmod 644 /etc/samba/shares.conf
chown :sambashare --recursive /rpool/_Backup
chmod g+rwx --recursive /rpool/_Backup
Final Check and Start the Service
Before starting Samba, verify that the configuration is valid:
1
testparm   # Checks for syntax errors and lists available shares
If no errors appear, enable and start the service:
1
2
systemctl enable --now smbd nmbd
systemctl status smbd nmbd
From a Windows or macOS system, test access to the share.
10. Install Additional Software & Tools
Sanoid & Syncoid
For Creating Snapshots and Replicating ZFS Datasets
1
2
apt update
apt install -y sanoid
- Create the configuration
/etc/sanoid/sanoid.conf
Samples are available from:
- Enable the timer:
1
2
systemctl enable --now sanoid sanoid-prune
systemctl status sanoid sanoid-prune sanoid.timer
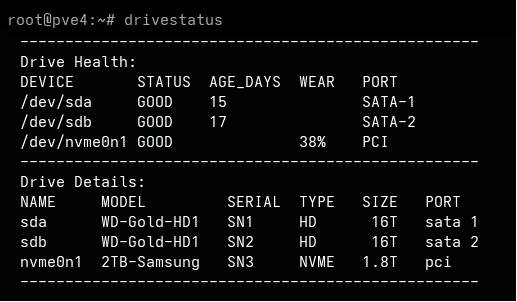
DriveStatus
drivestatus is a small utility for identifying disks.
Example output:
- Download and Install
drivestatus1 2 3
sudo wget -O /usr/bin/drivestatus \ https://raw.githubusercontent.com/Mikesco3/drivestatus.sh/main/drivestatus.sh && \ sudo chmod +x /usr/bin/drivestatus
ZeroTier
1
curl -s https://install.zerotier.com | sudo bash
11. Replicate Production VMs
Once we have Production VMs we can setup replication to their Shadow Equivalents:
In this example we will replicate
VM 201to aShadow VM 1201
Create the Shadow VM:
- Copy the VM Config file in
/etc/pve/qemu-server/from201.confto1201.conf - Change the Shadow VM drive entries:
- In
/etc/pve/qemu-server/1201.conf
Example:
from:
fast200vm 201
efidisk0: fast200_VMs-zfs:vm-201-disk-0,efitype=4m,pre-enrolled-keys=1,size=1M
tpmstate0: fast200_VMs-zfs:vm-201-disk-1,size=4M,version=v2.0
virtio0: fast200_VMs-zfs:vm-201-disk-2,discard=on,iothread=1,size=150G
To:
_Shadowvm 1201.
efidisk0: rpool_Shadows-zfs:vm-1201-disk-0,efitype=4m,pre-enrolled-keys=1,size=1M
tpmstate0: rpool_Shadows-zfs:vm-1201-disk-1,size=4M,version=v2.0
virtio0: rpool_Shadows-zfs:vm-1201-disk-2,discard=on,iothread=1,size=150G
- Disable the network interfaces of the Shadow VM 1201:
Create the Replication Script
In our example we’re creating the script in /root/replicateVMs-to-Shadows.sh
1
2
3
4
5
6
7
#!/usr/bin/bash

## VM 201 Win11
  /usr/sbin/syncoid --force-delete fast200/_VMs/vm-201-disk-0 rpool/_Shadows/vm-1201-disk-0 && \
  /usr/sbin/syncoid --force-delete fast200/_VMs/vm-201-disk-1 rpool/_Shadows/vm-1201-disk-1 && \
  /usr/sbin/syncoid --force-delete fast200/_VMs/vm-201-disk-2 rpool/_Shadows/vm-1201-disk-2
Schedule the Script
Schedule this script from crontab -e:
5 8-18/2 * * * /root/replicateVMs-to-Shadows.sh >/dev/null 2>&1
12. Maintenance & Lifecycle Planning
- Enable Sanoid
- Configure replication
- Schedule scrubs
- Configure monitoring & Alerts
- Verify Replicatoin and Restores
Keep Proxmox Updated ___
- Backup Strategy
- Schedule Lifecycle & Redundancy Planning
- Disaster Recovery Drills
Schedule Replacements:
- NVMe Wear Level
- Hard Drives
- CMOS Battery
If you run into installer issues, network problems, USB/KVM quirks, or hardware compatibility issues, refer to the Troubleshooting section of the full guide Link: